Railings for concrete steps are one of the most useful safety upgrades a home can get before winter. Front steps, side entrances and basement walkouts take the worst of the season: ice, packed snow, road salt and people carrying groceries with no free hand. A solid rail gives everyone something to hold when the surface turns slick.
The challenge is that concrete steps are not a deck. You cannot screw into a joist and call it done. The concrete has to be sound, the anchors have to suit it, and the railing has to fit the code requirements for your entry. This guide walks through each decision, from code basics to mounting methods, so your new exterior aluminum railings stay solid for years.
Why Railings for Concrete Steps Matter Before Winter
Across Toronto and the GTA, October and November are the last comfortable months for exterior work such as installing railings for concrete steps. Once the ground freezes and snow arrives, drilling into cold, wet concrete gets harder and concrete patching products become much less forgiving.
Planning railings for concrete steps in the fall also means the rail is in place for the months when it gets used most. A handrail matters far more in January, when a thin layer of black ice covers the treads, than it does in July.
There is a practical side too. Many homeowners notice a loose or rusted rail during fall cleanup, then put off the fix. A wobbly front step railing on icy steps is a liability, both for your family and for visitors, delivery drivers and anyone else who uses your entrance.
What the Ontario Building Code Expects at Your Steps
Railings for concrete steps usually involve two different components. A handrail is the rail you grip while climbing. A guard is the barrier that stops a fall off the open side of a landing, porch or stair. Our guide to guards and handrails on Ontario decks explains the difference in more detail.
Under the current Ontario Building Code, a guard is generally required where a landing, porch or similar walking surface is more than 600 mm (about 24 in.) above the adjacent surface within 1.2 m. The Town of Halton Hills’ residential deck permit guide, which is based on the 2024 code, shows guards at a minimum of 900 mm high where the walking surface is 1.8 m or less above grade, and 1,070 mm high above that.
The same guide shows openings between pickets of less than 100 mm, and no member between 140 mm and 900 mm that would make the guard easy to climb. It also notes that guards made of metal or glass need engineered design documentation, which a railing manufacturer should be able to supply.
Do 3 concrete steps need a railing in Ontario?
In most cases, a handrail becomes mandatory on exterior stairs once there are more than three risers. A typical front entry with three risers or fewer may not legally need one, but adding a handrail for concrete steps is still a smart choice where people walk in winter.
Count risers, not treads, when you plan railings for concrete steps. A set of steps with three treads plus a landing can have four risers, which changes the answer. If your landing is high enough to need a guard, that requirement applies regardless of the step count.
How high should a handrail be on outdoor steps?
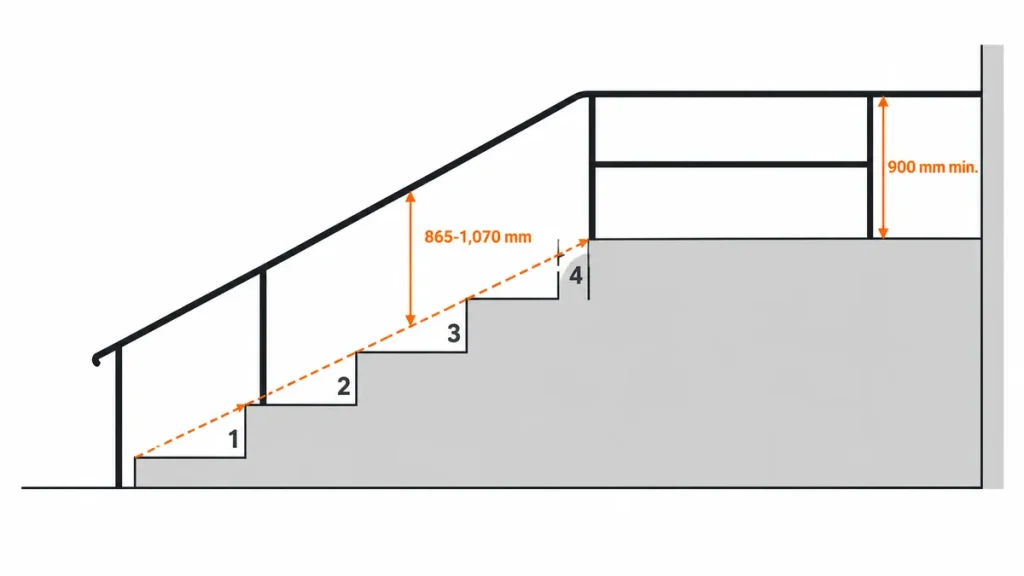
Handrails on stairs are typically set between 865 mm and 1,070 mm high, measured vertically from the line of the stair nosings. Most residential handrails land somewhere in the middle of that range so they feel natural to grab.
If the handrail runs along a brick or stone wall beside the steps, leave enough clearance between the rail and the wall for a full grip. Rough masonry needs a little more room than smooth siding, so confirm the clearance with your municipality or installer before you finalize the layout.
Because municipalities enforce the code and some projects involving railings for concrete steps need permits, check with your local building department before work starts. Toronto, for example, lists when a building permit is needed on its building permit requirements page, including decks more than 60 cm above ground.
Check the Concrete Before You Choose a Railing
A railing is only as strong as what holds it. Before you pick a style for your railings for concrete steps, look closely at the steps themselves.
- Cracks and spalling: flaking surfaces or cracks near the edges can break out when anchors are tightened.
- Settlement: steps that have pulled away from the house or tilted forward may need repair before any railing goes on.
- Edge distance: anchors set too close to the edge of a tread can split the concrete. The anchor manufacturer’s edge-distance rules apply.
- Construction type: some precast steps have hollow sections or thin walls, which limits where you can drill.
- Finishes: stone, tile or interlock caps over the concrete need a mounting plan that reaches solid material underneath.
If the steps are badly damaged, repair or replacement comes first. New railings for concrete steps will not hold well in concrete that is already breaking down.
Mounting Options for Railings for Concrete Steps
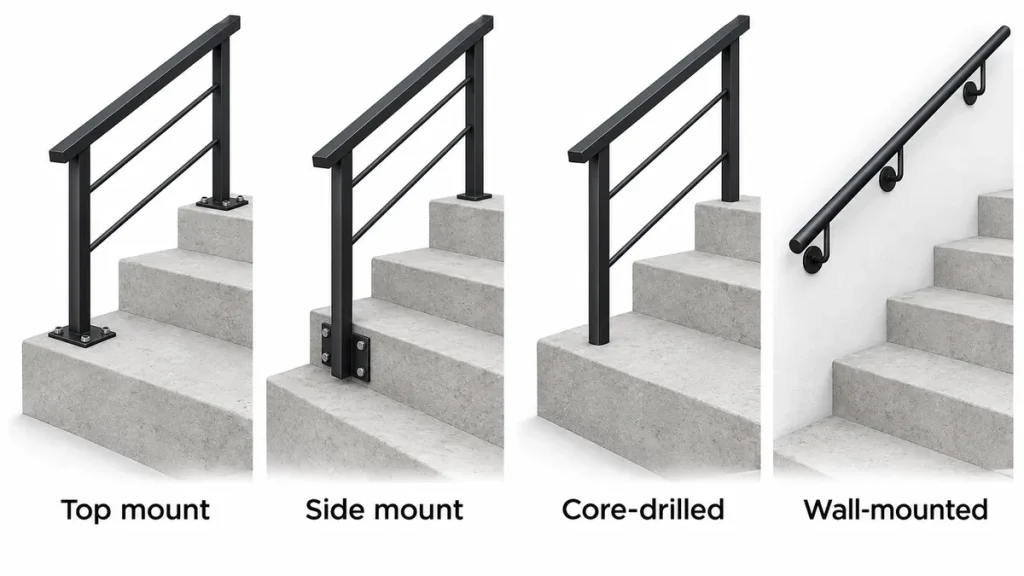
There are four common ways to mount railings for concrete steps. The right choice depends on the width of your treads, the condition of the concrete and the look you want.
| Mounting method | How it works | Best suited to | Watch for |
|---|---|---|---|
| Top-mounted base plate | Post sits on a plate bolted to the tread or landing with concrete anchors | Solid steps with enough tread depth | Edge distance, plate covering part of the tread |
| Side (fascia) mount | Post brackets attach to the side face of the steps | Narrow steps where every centimetre of walking width matters | Solid side face, anchor depth |
| Core-drilled | Posts set into holes drilled into the concrete and grouted | Clean, plate-free look on thick concrete | Specialized drilling, water and freeze exposure at the hole |
| Wall-mounted handrail | Brackets attach the rail to an adjacent wall | Steps running beside the house | Grip clearance, solid backing in the wall |
Mounting railing to concrete always comes down to anchor quality. For a deeper comparison of the two most common approaches, see our top-mounted vs face-mounted railing guide. For base-plate posts, our picket railing installation steps for concrete show the basic sequence: drill the concrete, set the anchor bolts, place and bolt the posts, then assemble the sections and add the covers.
Can you install a railing on precast concrete steps?
Yes, as long as the anchors go into solid material. Precast steps are common on GTA homes, and many hold anchors well, but some designs have hollow areas behind the face.
Check the underside or sides where possible, and drill a test hole if you are unsure. Side mounting or a wall-mounted handrail can be a better option when the tread itself is too thin or close to a hollow section.
Choosing a Style: Picket, Glass or Decorative Aluminum
Once the mounting plan is settled, the style is mostly about looks and maintenance. Picket aluminum is the most common choice for railings for concrete steps because it is light, rust-free and easy to match to an existing porch or deck guard.
Glass railings for concrete steps suit modern homes and keep the entry open, but they show water spots and salt spray more readily, so they need more cleaning in winter. Decorative designs work well on heritage-style homes; our deco railings range adds scrolls and patterns without the upkeep of iron.
Colour matters too. Black and charcoal hide road grime well, while white and beige brighten a darker brick facade. Match the colour to your windows, door or eavestrough for a finished look.
Is aluminum or wrought iron better for front steps?
For most homes, an aluminum handrail for outdoor steps is the lower-maintenance option. Aluminum does not rust, while wrought iron needs regular scraping and repainting, especially where salt sits at the post bases each winter.
Wrought iron has a heavier, traditional look that some owners prefer. If you like that style but not the upkeep, read why we recommend wrought aluminum over wrought iron for exterior railings.
7 Mistakes to Avoid With Railings for Concrete Steps
Most problems with railings for concrete steps come from rushing the planning stage. Watch for these common errors.
- Drilling into damaged concrete. Anchors in cracked or spalling concrete loosen quickly, especially through freeze-thaw cycles.
- Ignoring edge distance. An anchor too close to the edge can break out a corner of the step.
- Counting treads instead of risers. This leads to the wrong answer on whether a handrail is required.
- Forgetting the landing. A high landing may need a guard even if the steps themselves are short.
- Stopping the handrail short. A rail that ends before the last step leaves people reaching for nothing at the bottom.
- Choosing an outdoor step railing style before measuring. Tread depth, step width and wall position decide which mounting methods are possible.
- Using bare steel or untreated hardware. Salt and moisture attack unprotected fasteners and stain the concrete.
Maintenance keeps railings for concrete steps solid over time. Rinse salt off the posts and base covers in spring, and check that anchors are still tight. Our powder-coated aluminum railing care guide covers the routine.
Plan Your Railings for Concrete Steps With AlumiguardMFG
The best railings for concrete steps start with sound concrete, a clear understanding of guard and handrail requirements, and a mounting method that suits the steps you actually have. Get those right, and the style becomes the easy part.
AlumiguardMFG manufactures aluminum picket, glass and decorative railing systems, including railings for concrete steps, in-house at our North York facility for homes and commercial properties across Toronto and the GTA. Our systems are engineered for Ontario Building Code requirements, which helps when your municipality asks for documentation.
Before winter sets in, take a few photos of your steps, note the number of risers, the width of the treads and the height of the landing, and contact AlumiguardMFG to talk through railing styles, mounting options and next steps for your entry.